 EN
EN

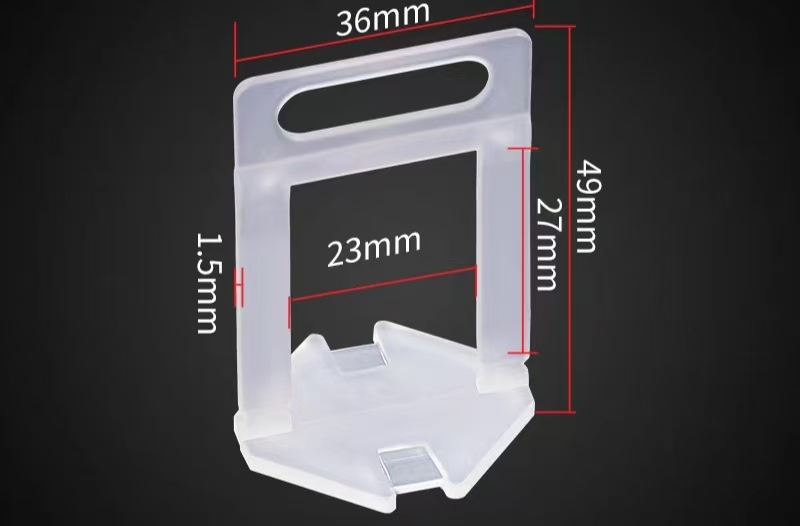
Core Mechanism of the Tile Leveler System
Wedge-and-clip physics: How vertical force translates to lippage elimination
The tile leveler system operates on the fundamental principle of the inclined plane. A clip is inserted beneath the edges of two adjacent tiles, and a wedge is driven horizontally through it. The wedge’s sloped surface converts horizontal insertion force into precise vertical lift at the grout joint—raising the lower tile until its surface aligns with the higher one. This targeted action eliminates lippage where height differences matter most. Installers use pliers to advance the wedge incrementally, leveraging mechanical advantage from the wedge angle to generate sufficient clamping pressure without excessive hand force. Unlike manual leveling methods that rely on feel, this physics-based approach delivers repeatable, consistent correction—even across large surfaces or tiles with slight thickness variations.
Why consistent clamping pressure matters more than raw strength for flatness
Flatness depends not on maximum clamping force, but on uniform pressure across all clips. Overtightening some wedges while leaving others loose creates imbalances that warp tiles or introduce new lippage. Consistent, moderate pressure ensures each tile edge is drawn evenly to the same plane—reducing risk of fracture (especially in thin porcelain slabs) and preventing clip deformation before adhesive cure. Uniform clamping also supports even mortar hydration and minimizes edge lifting. The system’s controlled wedge angle and pliers-limited travel ensure reproducible force every time—a critical advantage for large-format installations, where sub-millimeter discrepancies become visually apparent. Professional-grade flatness is achieved through precision distribution, not peak strength.
Tile Leveler Performance by Tile Size and Format
Large-format tiles (24×48+ in) and gauged porcelain tile panels: Bowing control and optimal clip spacing
Large-format tiles (24×48 inches and larger) and gauged porcelain panels often exhibit measurable bowing—up to 2 mm center-to-edge—even among premium products. This inherent warpage requires leveling force applied across the full surface, not just at edges. Dual-directional systems (combining horizontal tension arms with vertical compression pads) significantly improve performance: internal testing by a leading manufacturer found they reduce height variation by 83% on 900 mm tiles versus single-plane alternatives. For optimal results, place clips every 12–16 inches along tile edges and one at the center of each tile to anchor the panel firmly during adhesive cure. Per ANSI A108.02 (2022), allowable lippage for large-format installations is just 1/32 inch in grout joints under 1/4 inch—making uniform clamping pressure non-negotiable. Gauged porcelain panels—often thinner than 6 mm—require special care: excessive force risks micro-cracking, so adjust the leveler to deliver only the pressure needed for alignment.
Small and irregular tiles (≤12″, hex, mosaic): Clip density limits and fracture risk mitigation
Small-format and irregular tiles—including hexagons, mosaics, and penny rounds—are highly susceptible to chipping or cracking under high clamping force due to their reduced mass and thinner profiles. Clip usage must be conservative. The TCNA Handbook (2024) recommends no more than one clip per 4–6 tiles on mosaic sheets, placed exclusively at grout-line intersections where structural reinforcement is strongest. For hex tiles, avoid obtuse-angle placements that concentrate pressure unevenly; instead, position clips at the midpoint of each side. Over-clamping can also cause unintended lippage on flexible substrates, as insufficient adhesive support may allow the clip base to lift rather than compress. The objective is surface flatness without compromising grout-joint integrity—especially important given typical small-tile joint widths of 1/16 to 1/8 inch.
Material-Specific Behavior of the Tile Leveler
Porcelain vs. natural stone vs. glass: Accounting for rigidity, porosity, and thermal expansion
Material properties directly influence how the tile leveler must apply force to achieve flatness without damage. Key distinctions include:
| Material | Rigidity & Warpage | Porosity & Moisture Sensitivity | Thermal Expansion Coefficient | Leveler Pressure Guidance |
|---|---|---|---|---|
| Porcelain | High modulus; common bowing up to 0.5% of diagonal length (ISO 10545‑2, 2023) | Negligible (<0.5% water absorption) | 5–7 ×10⁻⁶/°C | Use standard clip tension; warped tiles need closer clip spacing for full flattening |
| Natural stone (e.g., marble) | Variable; often rigid but can contain micro‑fissures | Porous (0.5–5% absorption); moisture can cause expansion and staining | 3–8 ×10⁻⁶/°C | Reduce clamp force to avoid chipping; moisture‑sensitive stone requires rapid leveling before mortar sets |
| Glass | Stiff but brittle; zero warpage tolerance | Impermeable | 8–9 ×10⁻⁶/°C | Apply minimal, uniform pressure; differential expansion between glass and substrate may cause stress cracks if over‑tightened |
Porcelain’s low absorption makes it ideal for wet areas, but its manufacturing bow demands consistent clamping across the tile—not brute force. Natural stone, especially softer varieties like limestone or travertine, requires torque-sensitive handling to prevent spalling. Glass tile, though dimensionally stable, is unforgiving: uneven pressure induces micro-cracks that may propagate post-installation. Matching clip design and tension to material behavior prevents failure.
The vinyl and fiberglass exception: Why high-clamp-force tile levelers can worsen lippage on flexible substrates
Flexible tiles—including luxury vinyl tile (LVT) and fiberglass-backed vinyl—respond poorly to aggressive leveling. Their pliability means high-clamp-force systems can depress the tile edge below adjacent rigid tiles, creating reverse lippage (a visible dip). Rather than being pulled upward, the flexible tile deforms downward under pressure. For these materials, non-invasive alignment is safer: many professionals skip clips entirely and prioritize substrate flatness and precise adhesive application. If a tile leveler is used, it must permit only light contact—typically under 5 lbs of force—to avoid introducing defects.
FAQ
How does the tile leveler system eliminate lippage?
The tile leveler uses a wedge-and-clip mechanism that converts horizontal force into precise vertical pressure at grout joints, aligning tiles consistently.
What is the optimal clip placement for large-format tiles?
Place clips every 12–16 inches along edges and one at the center of each tile for uniform alignment during adhesive cure.
Are some materials more prone to damage when using tile levelers?
Yes, natural stone and glass require careful handling to avoid micro-fissures or cracks. Flexible substrates like vinyl may deform under high clamping force.
Why is consistent clamping pressure important?
Uniform force prevents tile warping and ensures professional-grade flatness without risking fractures or clip deformation.
Are tile levelers suitable for small or irregular tiles?
They can be used conservatively, ensuring clips are only placed at structurally strong intersections to prevent chipping or cracking.
